Pages

Tuesday, October 29, 2013

Red Velvet Mini's

     Last night I made red velvet cupcakes to send with Austin to work today.  I made enough so I could take some to work with me as well.  They turned out perfectly.  I made mini's because they are simple and perfect for any kind of event or occasion.    
  
Cook Time: 18-22 minutes for regular size; 10-11 minutes for mini muffins
Oven Temperature: 350 degrees

Ingredients for Cupcakes:
- 1 1/2 cup sugar
- 1/2 cup butter (1 stick), room temperature
-2 eggs, room temperature
- 2 1/3 cup flour
- 2 1/2 Tbs of cocoa
- 1 tsp baking soda
- 1 tsp baking powder
- 1/2 tsp salt
- 1 cup buttermilk
- 1 1/2 tsp red food coloring
- 1 tsp vanilla extract
- 1 tsp distilled white vinegar

Directions to Make Cupcakes:
1. Preheat the oven to 350 degrees.  Beat the butter and sugar in mixer for 3 minutes on medium speed until light and fluffy.


2. Add the eggs, one at a time, beating until each is fully incorporated.  Be sure to scrape down the sides of the bowl to ensure even mixing.

3. In a large bowl, sift together the flour, cocoa powder, baking soda, baking powder, and salt.  In another bowl whisk together the buttermilk, vinegar, vanilla extract, and food coloring.


4. Add a fourth of the dry ingredients and mix, then add a third of the wet.  Continue adding in a dry, wet, dry pattern, ending in dry ingredients.

5. Scoop into cupcake papers, about 1/2 to 3/4 of the way full.  Bake for 18-22 minutes or until a toothpick comes out clean.  Rotate the pan after the first 15 minutes of baking to ensure even baking. (For mini cupcakes, it took between 10 and 11 minutes)


6.  Allow to cool for one minute in the pan then transfer to a wire rack to cool completely.
Ingredients for Frosting:
- 1/2 cup of butter (1 stick), room temperature
- 8 oz. cream cheese
- 3-4 cups of powdered sugar
- 1 tsp of vanilla

Directions to make frosting:
1.  Cream the butter and cream cheese together, about 3 minutes.  Scrape down the sides and bottom of the bowl to ensure even mixing.

2.  Add the vanilla extract and mix.


3.  Add the powdered sugar, continually taste to get the desired sweetness. Pipe onto cooled cupcakes.  


     In order to take these cupcakes to work, I used a cupcake carrier I got from Kmart.  This is my favorite way to carry cupcakes.  This particular carrier was in Kmart's Sandra Lee collection.  This carrier is definitely a worth while purchase!  It is sturdy and functional!


Friday, October 25, 2013

High Five For Friday!

     It's Friday again!  I had such a busy week.  Unfortunately, I am working Saturday and Sunday as well.  But even when I know I have to work over the weekend, I still look forward to Friday.  Here are my five highlights from this week!

1.  We got back Sunday from a wonderful weekend at the beach.  We were able to spend time with my parent which was so nice!  We went on tons of walks on the beach and we also got to go to the aquarium!


2.  Bella is so funny at the beach!  She had so much fun!  I have never seen her happier.


3.  I started school!  I am so happy to be doing school work again, but I think I'm just starting to realize how busy life is about to be for the next year and a half.  I am so thankful for the opportunity to be back in school. 


4.  This time of year is wonderful!  I love fall!  I love the weather, I love the food, and I love the smells.  I love lighting my pumpkin spice candle this time of year!


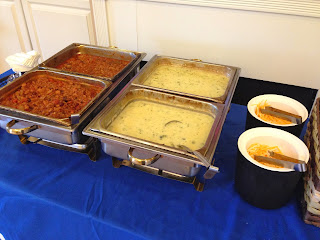
5.  We had an event at work yesterday for our residents.  We had chili and broccoli and cheddar soup.  It was delicious and warmed me right up!  I love opportunities to get to spend time with our residents!  


It was a great week!  Hope everyone has a great weekend!

Tuesday, October 22, 2013

Apple Crisp

     It is my favorite time of year to do some serious baking!  Especially with apples!  Two weekends ago, my hubby and I went to Carter's Mountain with some friends of ours.  Carter's Mountain is located in Charlottesville, VA and it is the best apple orchard.  Austin and I have gone a few times and we have always enjoyed ourselves.  This year we unfortunately chose the rainiest day to go.  It was so muddy, we decided to leave the apple picking to the experts and bought apples that were pre-picked.  From the people we saw coming back with their apples, I was convinced there was no way I was going to pick my own.  Everyone was covered in mud! 

     We enjoyed some apple cider and hot, fresh apple cider doughnuts.  We also ended up with two huge bags of Jonagold  apples.  This is definitely our favorite type of apple.  They taste great and they are perfect to bake with.

     I ended up making apple crisp as well as some apple sauce.  I loved how they turned out!  I thought I would share this delicious recipe for apple crisp today.  My mother-in-law shared her wonderful recipe with me.  It happens to be one of my hubby's  favorite recipe. 


Here is the delicious recipe:

Cook Time: 50-60 minutes
Oven Temperature: 350 degrees

Ingredients for apple crisp:
·         About 5 Cups of apples (peeled, cored, and sliced)
·         2/3 Cup of Sugar
·         3 Tbs Flour
·         Cinnamon (I don't use an exact amount; probably 2-3 tsp)

Ingredients for apple crisp topping:
·         1 Cup of Melted Butter
·         1-1/2 Cup of Brown Sugar
·         1-3/4 Cup Flour
·         2 Cups of Quick Oats
·         A little more cinnamon

Directions: 
1.  Heat oven to 350 degrees.  

2.  Place peeled, cored, and sliced apples in 9 X 13 pan.  


3.  Mix 2/3 cup of sugar, 3 Tbs flour, and cinnamon in a small bowl.  


4.  Fold mixture in to apples in pan.  


5.  Melt butter in a large bowl.  

6.  Once it is completely melted, mix 1-1/2 cup of brown sugar, 1-3/4 cup flour and 2 cups of quick oats in with the melted butter.  


7.  Sprinkle this mix over the apples.  This will make the dish very full.  


8.  Bake for 50-60 minutes or until the apples are tender and the mixture is bubbly.  The top will be browned.  


9.  Enjoy!


Monday, October 7, 2013

Wooden Shelf

     I recently redid a shelf that I had bought for $2 at a yard sale.  The shelf was just plain wood but I really liked how it looked.  My hubby and I went to Walmart to buy some paint so I could fix it up. 

     I haven't painted furniture before so I was very excited for this project.  I ended up spending a lot more on the materials to fix it up than I expected, but I think the end result was definitely worth it.  I got sand paper, paint brushes, and paint.

     The man at Walmart was so helpful and patient as I was picking a paint color.  I was so worried that I wouldn't like it once I painted the shelf, but I ended up loving the paint color I got.  It was called Coolbreeze Blue.  I choose to use a paint and primer together so I didn't have to do as many coats.  I went back and forth on the type of finish I wanted, but in the end I went with eggshell.  It has a bit of a shine, but not too much. 


     Here are some before and after pictures.